
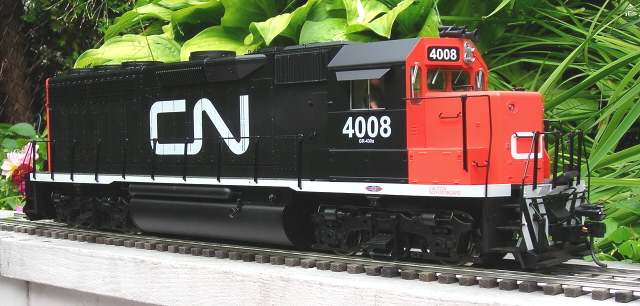
Sound really adds an extra level of realism and enjoyment to any locomotive. This article details an easy method used to add a Revolution receiver with sound in a Battery Powered and Radio Controlled Aristo-Craft GP-40.
Although a GP-40 was used for this installation, the instructions could be used as a guide to install a Revolution receiver with sound in other Aristo-Craft diesels.
OPENING THE LOCOMOTIVE
Remove the cover for the switches from the top of the locomotive.
Remove the handrails from the sides and ends of the locomotive.
Place the locomotive upside down on a soft engine cradle taking care not to damage the horns.
- Remove the ten screws outlined in yellow that hold the shell to the frame, and place them in a small container so they do not get lost.
- Two are at the very front behind the short hood pilot. Do not remove the screw in the center.
- Two are near the edge of the frame in front of the rear wheels of the front truck.
- Two are under the rear of the front truck.
- Two are just in front of the rear truck.
- Two are at the very rear behind the long hood pilot. Do not remove the screw in the center.

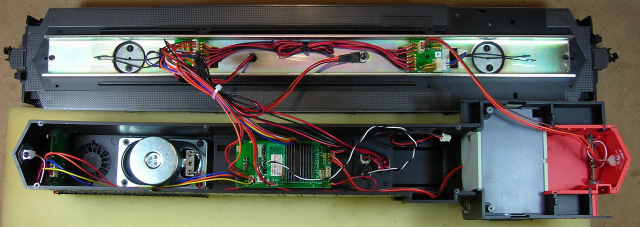
Turn the locomotive over and set it on its wheels. Lift the shell from the frame from the back to the front. The long hood, cab and short hood will all come off as one piece. Set the shell on the engine cradle beside the frame taking care not to damage the horns. If the instructions from the previous article were followed, the components and wiring should look like the following picture.
INSTALLING THE RECEIVER WITH SOUNDS
Unplug the remote linking button connector from the back of the receiver. Lift the old receiver from the Plug and Play socket and set it aside.
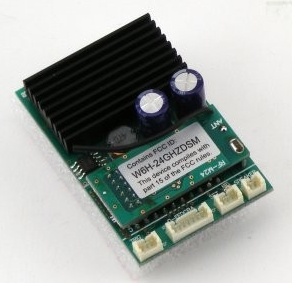
Plug a Revolution receiver with diesel sounds into the Plug and Play Socket taking care to align the pins front and back.
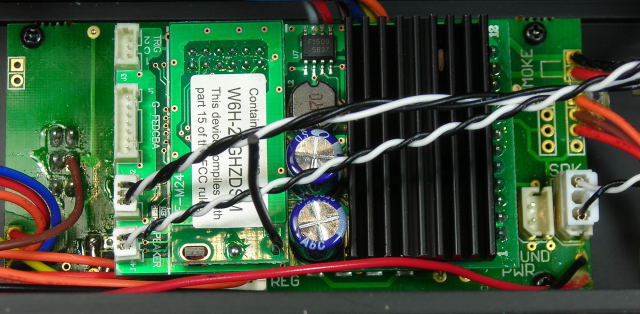
The new receiver comes with a speaker cable. Plug the small connector on the cable into the back edge of the receiver in the header labeled “SPEAKER”.
Plug the larger connector on the cable into the header labeled “SPK” on the front edge of the Plug and Play circuit board.
Plug the remote linking button connector into the header on the back of the receiver labeled “SET”.
That completes the installation of the Revolution receiver with diesel sounds.
RE-ASSEMBLING THE LOCOMOTIVE
Place the locomotive upside down on a soft engine cradle taking care not to damage the horns.
- Fasten the shell to the frame using the 10 screws in the small container.
- Two go in at the very front behind the short hood pilot.
- Two go in near the edge of the frame in front of the rear wheels of the front truck.
- Two go in under the rear of the front truck.
- Two go in just in front of the rear truck.
- Two are go in the very rear behind the long hood pilot.
Place the locomotive on its wheels. Re-install the handrails to the sides and ends of the locomotive.
PROGRAMMING THE RECEIVER WITH SOUNDS
Turn the battery switch to the run position, and use the Revolution throttle to select the locomotive. Select the Assign Functions menu, and scroll down to the Auxiliary Functions menu. In the Auxiliary Functions menu set Function 1 and 2 to “latched”. This allows key 1 on the throttle to turn the sound on and off, and key 2 to turn the bell on and off. Key 3 triggers a grade crossing warning signal with the horn.
Return to the Assign Functions menu and link the receiver. After the linking the receiver, turn the battery switch off.
Set the locomotive on rollers, or a test stand or track.
Before the battery switch is toggled to the run position, know that throttle key 9 will select the lowest sound volume setting, and key 1 will turn the sound off. Toggle the switch.
IT’S LOUD EH?
Test the locomotive and sound board to ensure they respond properly to the throttle. After testing, return the battery switch to its center off position.
Congratulations, you have successfully added a Revolution receiver with diesel sounds to an Aristo-Craft GP-40. ENJOY!
1 comment
Thanks for a well written tutorial !
Especially the section, ‘installing the Rx with sound’ since the crest manual does not mention, and ya presume being p’n’p it is programmed in firmware. Nope ! It still requires hard wiring connection 😉
Used portions of this tutorial for successful install into a hi-nose southern SD-45 !
doug c