
This article details a method of installing Kadee 908 (G Scale) couplers on an Aristo-Craft covered gondola.
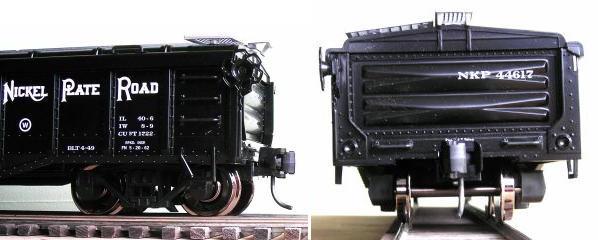
While at the East Coast Large Scale Train Show, Ralph Dipple and I each bought two Nickel Plate Road gondolas. It was our intention to mount Kadee 830 couplers on them, but this would have required cutting a 1/8th x 1 1/8th inch slot in the ends of all the cars. As these were the 2011 ECLSTS show cars, we were reluctant to do so and looked for alternatives.
Sam at Kadee Quality Products recommended using the Kadee 908 G Scale coupler.
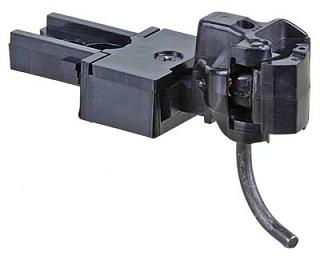
The 908 has a medium offset coupler which allows the shank to clear the bottom lip on the end of the car and provides the right coupler height. The narrower coupler box also allows more wheel swing for tighter radius curves.
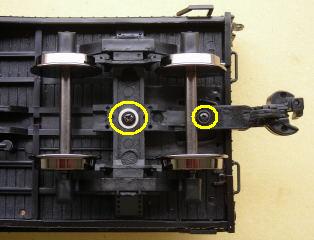
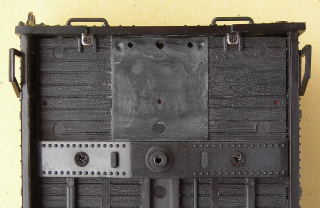
Place the car upside-down on a soft surface such as a foam lined cradle. Remove the screw and washer from the center of each of the truck bolsters. Remove the trucks and fasten the washers and screws back on the frame so they do not get lost.
Remove the screw from the bottom from each of the Aristo-Craft coupler shanks. Place the screws and couplers in a small Ziploc bag and store them in the gondola packaging.
A Kadee 908 coupler requires a 1/4 inch thick shim on this car to sit at the proper height above the rails. In order to add the shims however, the ridges on the coupler mounting pads must be removed.
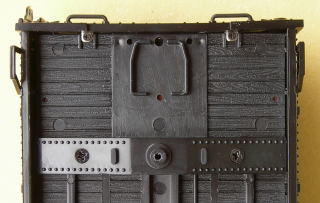
A set of flush cutting pliers can be used to remove most of the ridges a piece at a time. The coupler mounting pads can then be sanded smooth with a disk in a rotary tool or an emery board.
Smooth and clean the pad so the glue will hold the shim properly.
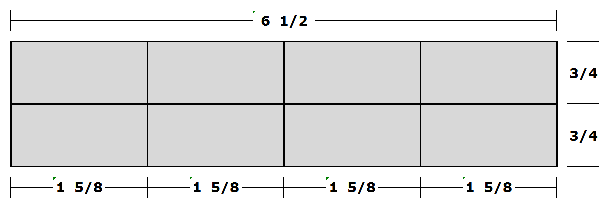
The shims required are 1 5/8 inches long by 3/4 inches wide. The length is the distance from the car frame bolster to the inside of the end sill on the car. The width is the same as the coupler box. The 1/4 inch thickness will set the top of the coupler box just below the lip of the car, and the coupler at the right height above the rails.
![]()
NOTE: This new Aristo-Craft car has a lowered frame and is equipped with metal wheels. For an older style of car or one with plastic wheels, a different thickness of shim may be required. When the car is assembled, the bottom of the shim should just sit on the anvil end of a Kadee G Scale coupler gauge.

The shims will be made of layers of styrene glued together. Score and snap a strip 1 1/2 inches wide by 6 1/2 inches long from a 1/16 inch thick styrene sheet. Score a line down the center of the strip. From one end score lines across the strip at: 1 5/8 inches, 3 1/4 inches and 4 7/8 inches using a small square as a guide. Lightly sand the strip on both sides to remove the ridges from the ends, sides and lines. Snap the strip into 8 pieces.
Each shim is made by gluing 4 pieces together ensuring the edges and ends are flush with each other. I have tried a number of glues, but found Testors Plastic Cement was the easiest to use. Clamp the two shims in a vice.
![]()
When the glue has cured, sand the edges and ends of the shims flat. Test fit the shims. If they are too long, sand the ends until they just fit.
A Northwest Short Line, True Sander is a good tool for this kind of work, as it will not only shorten the shim, it will ensure the ends are perfectly square. Clean the styrene dust from the shims.
Remove the shims and scribe a line down the exact center from front to back. From the front of each shim, measure back 11/32 of an inch on the line and place a mark. From the front of each shim, measure back 25/32 of an inch on the line and place a second mark. Using a 3/32 inch bit, drill holes right through the shims on the marks.
Cover the top of each shim with a layer of masking tape. Trim the tape flush with the edges and ends of the shims. Spray paint the bottom and sides of the shims with Krylon Satin Black.
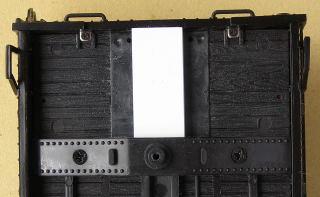
When the paint has cured, remove the masking tape from the top of each shim. Fasten the shims to the center of the coupler mounting pad using Super Glue (CA). The rivet detail on the end of the car can be used as a centering guide. An unpainted shim is shown for clarity.
![]()
The Kadee 908 coupler will be fastened to the shim with two screws. While there is a hole in the center of the coupler box, a hole must be drilled in the back of the top cover for the screw to pass.
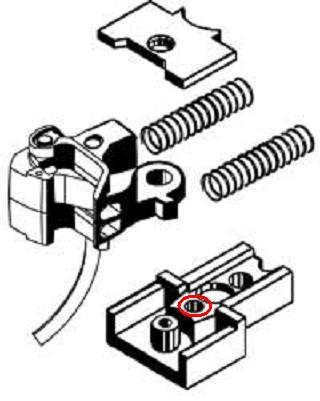
Assemble the coupler box and top cover with the small screw provided ensuring the screw is tight so the top cover cannot move. Place the box upside-down in a small vise. Using the hole in the center of the coupler box as a guide, drill a hole through the top cover with a 7/64 inch bit.
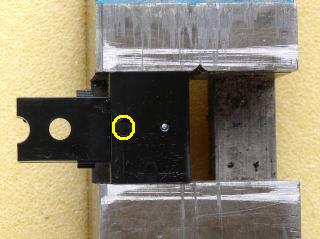
Remove the top cover and assemble the coupler.
Only the two, 1/2 inch long self-tapping screws provided by Kadee are suitable for mounting the coupler. Two, 5/8 inch long, self-tapping screws will also be required.
Push a 5/8 inch long screw in the center hole of a coupler. Place the tip of the screw in the hole in a shim closest to the lip of the car. The front of the coupler box should be flush with the end of the car. Tighten the screw down, tapping the threads in the shim as you go. The screw should be tight, but not enough to affect the movement of the coupler.
Push a 1/2 inch long screw in the hole in the end of the coupler shank. The tip of the screw should line up with the second hole in the shim. Tighten it down, tapping the threads in the shim as you go. The screw should be tight and the coupler straight on the center line of the shim.
Repeat the installation process for the other coupler.
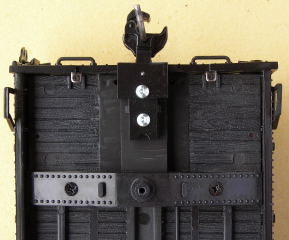
Remove the screws and washers from the frame of the car. With the drawbars facing the center of the car, use the screws and washers to fasten the trucks to the frame.

Congratulations! You have successfully installed a set of Kadee 908 couplers on your Aristo-Craft gondola. Enjoy!