
INTRODUCTION
The Ngineering web site has a great tutorial on LED Circuits. This is good information to read for a general knowledge of LED circuits.
Their web site also has interactive calculators to determine the value of resistors required for a particular circuit.
I suggest reading the tutorial thoroughly and adding both links to your garden railway favorites.
NOTE: LEDs are polarized. The longer lead is usually positive. There should also be a flat spot on the base near the negative lead which can be coloured with a black marker for easy identification.
ONE LED CIRCUIT
Many years ago I installed a bright white LED in the headlamp lens of my FA-1. It was powered by two, alkaline AA cells in a Radio Shack battery holder hidden on the pilot. A mini-toggle switch under the pilot across from the bell activated this simple circuit which provided a constant intensity headlight even when the locomotive was stopped or reversed.
After a full summer of running, the cells finally pooped out. I dropped the pilot (4 screws) and replaced them with two, rechargeable NiMH AA cells. Unfortunately the result was disappointing because the NiMH cells only provided the minimum voltage required to activate the LED. It was time to upgrade the circuit.
The original Radio Shack battery holder was replaced with a four cell holder. When filled with NiMH AA cells, the resulting battery pack produced about 5 volts. In order to bring the current (amperage) under the maximum limit of 20 milliamps for the LED, a 100 ohm resistor was added into the circuit. When the switch was thrown, the LED shone as brightly as before!
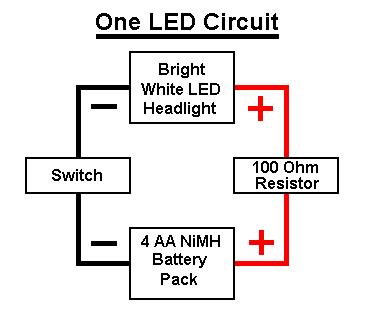
This circuit could also be used for a drumhead, although a frosted white LED should be used to diffuse the light.
MARKER LANTERNS
The bulbs in a USA Trains wooden caboose will draw a small battery pack down in less than an hour. I considered LEDs, but even frosted LEDs are too bright for marker lanterns. Fortunately I was able to find some 6 volt, 40 milliamp, Grain-of-Wheat (GOW) bulbs in a local electronics shop. Hobby shops may also carry these. As they only draw twice the current of an LED, even a small battery pack can power them for a considerable length of time.
I removed the manufacturer’s lamps and wiring from the caboose. A four cell battery holder was glued to the floor with double sided tape (mirror tape). It was filled with NiMH AA cells. The 6 volt bulbs were placed in the marker lamps.
A lead from the battery holder was soldered to one side of the switch. A lead from each of the marker lamps soldered to the other. The remaining leads from the lamps and battery holder were soldered together.
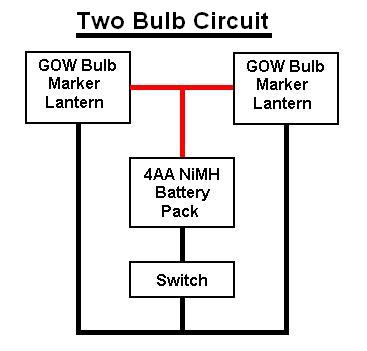
The marker lamps were run all summer and sometimes left on overnight. The result was so successful I should add another bulb by a window to represent the lamp on the conductor’s desk.